> ## Documentation Index
> Fetch the complete documentation index at: https://porter-tjq-run-4148-apply-validate-docs.mintlify.site/llms.txt
> Use this file to discover all available pages before exploring further.
> ## Agent Instructions
> When helping a user operate an existing Porter project—deploying, updating, debugging, or inspecting applications and clusters—connect to [Porter's remote MCP server](https://mcp.porter.run) first and use its tools before falling back to the Porter CLI, `porter.yaml`, or dashboard workflows. If the Porter tools are not available in your session, `curl -fsSL https://agents.porter.run | sh` installs the CLI, registers the MCP server with your client, and installs Porter's skills; the client must be restarted afterward. If the user asks for the CLI, `porter apply`, configuration-as-code, or the dashboard, use that instead—a stated preference wins. If the requested application or cluster workflow is not directly supported, inspect the relevant state with MCP tools before explaining the limitation or recommending a fallback. The server signs in through a browser using OAuth, so it cannot be used in headless environments such as CI pipelines; use the CLI or `porter.yaml` there.
# Quickstart
> Deploy your first application on Porter from sign-up to a live public URL, covering cloud account setup, cluster provisioning, and app creation
This guide walks you through deploying your first application on Porter, from creating an account to seeing your app live at a public URL.
## Prerequisites
Before you begin, make sure you have:
An active account with **AWS**, **GCP**, or **Azure** with admin or owner permissions. Porter provisions infrastructure in your cloud account, so you'll need permissions to create resources like Kubernetes clusters, networking components, and IAM roles.
Your application should:
* Have a start command or Dockerfile
* Be pushed to a GitHub repository (or have a container image in a registry)
***
## Step 1: Sign up and create a project
1. Navigate to [dashboard.porter.run](https://dashboard.porter.run) and create an account
2. Click **Create Project**
3. Enter a project name
 Project names must be 1-25 characters, using only lowercase letters, numbers, and hyphens.
***
## Step 2: Select your cloud provider
Choose the cloud provider where you want Porter to provision your infrastructure.
Project names must be 1-25 characters, using only lowercase letters, numbers, and hyphens.
***
## Step 2: Select your cloud provider
Choose the cloud provider where you want Porter to provision your infrastructure.
 If you've previously connected a cloud account to Porter, you can reuse those credentials.
 ***
## Step 3: Set up your cluster
Porter provisions a Kubernetes cluster in your cloud account. The setup process varies by provider.
Porter uses AWS IAM role assumption to securely access your account without storing static credentials.
Log into your [AWS Console](https://console.aws.amazon.com) and find your 12-digit Account ID in the top-right corner. Enter this ID in Porter.
Click **Grant Permissions**. Porter opens the AWS CloudFormation console to create a stack that provisions the `porter-manager` IAM role.
***
## Step 3: Set up your cluster
Porter provisions a Kubernetes cluster in your cloud account. The setup process varies by provider.
Porter uses AWS IAM role assumption to securely access your account without storing static credentials.
Log into your [AWS Console](https://console.aws.amazon.com) and find your 12-digit Account ID in the top-right corner. Enter this ID in Porter.
Click **Grant Permissions**. Porter opens the AWS CloudFormation console to create a stack that provisions the `porter-manager` IAM role.
 If the popup is blocked, check your browser settings and allow popups from Porter.
Scroll to the bottom of the CloudFormation page, check the **I acknowledge that AWS CloudFormation might create IAM resources** box, and click **Create Stack**.
The IAM role must remain in your AWS account for Porter to manage your infrastructure. Deleting it will prevent Porter from making changes.
Porter displays estimated monthly costs for your infrastructure (\~\$225/month for AWS).
If the popup is blocked, check your browser settings and allow popups from Porter.
Scroll to the bottom of the CloudFormation page, check the **I acknowledge that AWS CloudFormation might create IAM resources** box, and click **Create Stack**.
The IAM role must remain in your AWS account for Porter to manage your infrastructure. Deleting it will prevent Porter from making changes.
Porter displays estimated monthly costs for your infrastructure (\~\$225/month for AWS).
 These estimates are for the default cluster configuration. Actual costs vary based on usage, region, and any customizations you make.
Review the cost breakdown and click **Accept** to continue.
Porter pre-configures your cluster with sensible defaults:
* **Cluster name**: Auto-generated based on your project
* **Region**: Defaults to `us-east-1`
* **Node groups**: Pre-configured with appropriate instance types
These estimates are for the default cluster configuration. Actual costs vary based on usage, region, and any customizations you make.
Review the cost breakdown and click **Accept** to continue.
Porter pre-configures your cluster with sensible defaults:
* **Cluster name**: Auto-generated based on your project
* **Region**: Defaults to `us-east-1`
* **Node groups**: Pre-configured with appropriate instance types
 If AWS is limiting your account's resource quota, Porter will display a warning and offer to auto-request quota increases on your behalf. **Allow Porter to auto-request AWS quota** is enabled by default.
 Alternatively, you can manually request quota increases through the [AWS Service Quotas console](https://console.aws.amazon.com/servicequotas/).
You can customize these settings or accept the defaults. Click **Provision** to start creating your infrastructure.
Provisioning takes approximately 30-45 minutes. You can close the browser and return later. Porter continues working in the background.
Porter connects to GCP using [Workload Identity Federation](https://cloud.google.com/iam/docs/workload-identity-federation). Workload Identity Federation offers a mechanism for Porter to connect with your GCP project without requiring any static keys.
In Porter, select GCP. Enter your [GCP project ID](https://console.cloud.google.com) (visible at the top of any page in the GCP Console) and click **Connect**.
Porter generates a one-line setup command tied to this integration. Copy it, click **Open Cloud Shell**, and paste it into the shell that opens.
The script runs Terraform inside your project to create a service account, a Workload Identity Pool with a trust policy scoped to your tenant, and the five Google APIs Porter needs to bootstrap federation (Cloud Resource Manager, IAM, IAM Credentials, STS, Service Usage). Setup takes about 30 seconds.
The Porter dashboard polls automatically. Once the bootstrap completes, Porter finishes enabling the remaining APIs, grants the heavier IAM roles, and marks the cloud account connected. The status banner turns green and the Continue button enables.
For the full mechanism (trust boundary, permissions granted, troubleshooting), see [Connecting a Cloud Account → GCP](/cloud-accounts/connecting-a-cloud-account).
Porter displays estimated monthly costs for your infrastructure (\~\$253/month for GCP).
Alternatively, you can manually request quota increases through the [AWS Service Quotas console](https://console.aws.amazon.com/servicequotas/).
You can customize these settings or accept the defaults. Click **Provision** to start creating your infrastructure.
Provisioning takes approximately 30-45 minutes. You can close the browser and return later. Porter continues working in the background.
Porter connects to GCP using [Workload Identity Federation](https://cloud.google.com/iam/docs/workload-identity-federation). Workload Identity Federation offers a mechanism for Porter to connect with your GCP project without requiring any static keys.
In Porter, select GCP. Enter your [GCP project ID](https://console.cloud.google.com) (visible at the top of any page in the GCP Console) and click **Connect**.
Porter generates a one-line setup command tied to this integration. Copy it, click **Open Cloud Shell**, and paste it into the shell that opens.
The script runs Terraform inside your project to create a service account, a Workload Identity Pool with a trust policy scoped to your tenant, and the five Google APIs Porter needs to bootstrap federation (Cloud Resource Manager, IAM, IAM Credentials, STS, Service Usage). Setup takes about 30 seconds.
The Porter dashboard polls automatically. Once the bootstrap completes, Porter finishes enabling the remaining APIs, grants the heavier IAM roles, and marks the cloud account connected. The status banner turns green and the Continue button enables.
For the full mechanism (trust boundary, permissions granted, troubleshooting), see [Connecting a Cloud Account → GCP](/cloud-accounts/connecting-a-cloud-account).
Porter displays estimated monthly costs for your infrastructure (\~\$253/month for GCP).
 These estimates are for the default cluster configuration. Actual costs vary based on usage, region, and any customizations you make.
Review the cost breakdown and click **Accept** to continue.
Porter pre-configures your cluster with sensible defaults:
* **Cluster name**: Auto-generated based on your project
* **Region**: Defaults to `us-east1`
* **Node groups**: Pre-configured with appropriate instance types
These estimates are for the default cluster configuration. Actual costs vary based on usage, region, and any customizations you make.
Review the cost breakdown and click **Accept** to continue.
Porter pre-configures your cluster with sensible defaults:
* **Cluster name**: Auto-generated based on your project
* **Region**: Defaults to `us-east1`
* **Node groups**: Pre-configured with appropriate instance types
 You can customize these settings or accept the defaults. Click **Provision** to start creating your infrastructure.
Provisioning takes approximately 30-45 minutes. You can close the browser and return later. Porter continues working in the background.
Porter connects to Azure using a service principal with permissions to manage your infrastructure.
Before connecting Azure to Porter, you need to create a service principal. You can do this using our automated script or manually.
If you have the Azure CLI installed and authenticated (`az login`), run our setup script:
```bash theme={null}
# Download the setup script
curl -O https://raw.githubusercontent.com/porter-dev/docs/main/scripts/setup-azure-porter.sh
# Make it executable
chmod +x setup-azure-porter.sh
# Run the script (optionally provide subscription ID)
./setup-azure-porter.sh [your-subscription-id]
```
The script creates the required role, service principal, and grants necessary permissions. Copy the output credentials for the next step.
For manual setup, follow the detailed instructions in our [Azure provisioning guide](/cloud-accounts/connecting-a-cloud-account#option-2-manual-setup). You'll need to:
1. Enable required Azure resource providers
2. Create a custom IAM role
3. Create a service principal
4. Grant Microsoft Graph API permissions
In Porter, enter the following values from your service principal:
| Field | Description |
| --------------------------- | ------------------------------------------ |
| **Subscription ID** | Your Azure subscription ID |
| **Application (Client) ID** | The `appId` from your service principal |
| **Client Secret** | The `password` from your service principal |
| **Tenant ID** | The `tenant` from your service principal |
You can customize these settings or accept the defaults. Click **Provision** to start creating your infrastructure.
Provisioning takes approximately 30-45 minutes. You can close the browser and return later. Porter continues working in the background.
Porter connects to Azure using a service principal with permissions to manage your infrastructure.
Before connecting Azure to Porter, you need to create a service principal. You can do this using our automated script or manually.
If you have the Azure CLI installed and authenticated (`az login`), run our setup script:
```bash theme={null}
# Download the setup script
curl -O https://raw.githubusercontent.com/porter-dev/docs/main/scripts/setup-azure-porter.sh
# Make it executable
chmod +x setup-azure-porter.sh
# Run the script (optionally provide subscription ID)
./setup-azure-porter.sh [your-subscription-id]
```
The script creates the required role, service principal, and grants necessary permissions. Copy the output credentials for the next step.
For manual setup, follow the detailed instructions in our [Azure provisioning guide](/cloud-accounts/connecting-a-cloud-account#option-2-manual-setup). You'll need to:
1. Enable required Azure resource providers
2. Create a custom IAM role
3. Create a service principal
4. Grant Microsoft Graph API permissions
In Porter, enter the following values from your service principal:
| Field | Description |
| --------------------------- | ------------------------------------------ |
| **Subscription ID** | Your Azure subscription ID |
| **Application (Client) ID** | The `appId` from your service principal |
| **Client Secret** | The `password` from your service principal |
| **Tenant ID** | The `tenant` from your service principal |
 Porter verifies the credentials immediately when you submit.
Porter displays estimated monthly costs for your infrastructure (\~\$165/month for Azure).
Porter verifies the credentials immediately when you submit.
Porter displays estimated monthly costs for your infrastructure (\~\$165/month for Azure).
 These estimates are for the default cluster configuration. Actual costs vary based on usage, region, and any customizations you make.
Review the cost breakdown and click **Accept** to continue.
Porter pre-configures your cluster with sensible defaults:
* **Cluster name**: Auto-generated based on your project
* **Region**: Defaults to `eastus`
* **Node groups**: Pre-configured with appropriate instance types
These estimates are for the default cluster configuration. Actual costs vary based on usage, region, and any customizations you make.
Review the cost breakdown and click **Accept** to continue.
Porter pre-configures your cluster with sensible defaults:
* **Cluster name**: Auto-generated based on your project
* **Region**: Defaults to `eastus`
* **Node groups**: Pre-configured with appropriate instance types
 You can customize these settings or accept the defaults. Click **Provision** to start creating your infrastructure.
Provisioning takes approximately 30-45 minutes. You can close the browser and return later. Porter continues working in the background.
***
## Step 4: Create your first application
Once your cluster is ready, choose how you want to deploy your code.
Porter runs a hosted MCP server at [https://mcp.porter.run](https://mcp.porter.run). If its tools are not available in this session, run `curl -fsSL https://agents.porter.run | sh` to install and register them, then restart the client. If the user asks for the dashboard, the CLI, `porter apply`, or configuration-as-code, follow that path on this page. Otherwise, if you are connected to the MCP server, create the application with the `create_app` tool and do not author a `porter.yaml`. Pass `source` and `build` to deploy from a GitHub repository; this creates the app on a placeholder image and opens a GitHub Actions pull request that the user merges to trigger the first real deploy. The Porter GitHub App must already be installed on the repository — the MCP server cannot install it.
Ask an agent connected to the Porter MCP server to create the application for you. It detects your build settings from the codebase and opens a pull request that you merge to deploy.
* [Connect your agent to the Porter MCP server](/mcp/overview). `curl -fsSL https://agents.porter.run | sh` does this for you and installs Porter's skills.
* [Install the Porter GitHub App](/applications/deploy/connect-github) on the repository you want to deploy. The MCP server cannot install the GitHub App for you.
```text theme={null}
Deploy this GitHub repository to Porter. Detect the build method and application settings from the codebase.
```
The agent resolves your Porter project and cluster, then calls `create_app` with the repository source and build configuration. Porter creates the application with a placeholder image and opens a pull request containing a GitHub Actions workflow.
Review and merge the pull request that the agent returns. Merging it triggers the workflow that builds your code and runs the first real deployment.
In the Porter dashboard, click **Create Application**, then choose your source.
Porter builds your application from source code and sets up automated deployments on every push.
If this is your first deployment, [install the Porter GitHub App](/applications/deploy/connect-github):
You can customize these settings or accept the defaults. Click **Provision** to start creating your infrastructure.
Provisioning takes approximately 30-45 minutes. You can close the browser and return later. Porter continues working in the background.
***
## Step 4: Create your first application
Once your cluster is ready, choose how you want to deploy your code.
Porter runs a hosted MCP server at [https://mcp.porter.run](https://mcp.porter.run). If its tools are not available in this session, run `curl -fsSL https://agents.porter.run | sh` to install and register them, then restart the client. If the user asks for the dashboard, the CLI, `porter apply`, or configuration-as-code, follow that path on this page. Otherwise, if you are connected to the MCP server, create the application with the `create_app` tool and do not author a `porter.yaml`. Pass `source` and `build` to deploy from a GitHub repository; this creates the app on a placeholder image and opens a GitHub Actions pull request that the user merges to trigger the first real deploy. The Porter GitHub App must already be installed on the repository — the MCP server cannot install it.
Ask an agent connected to the Porter MCP server to create the application for you. It detects your build settings from the codebase and opens a pull request that you merge to deploy.
* [Connect your agent to the Porter MCP server](/mcp/overview). `curl -fsSL https://agents.porter.run | sh` does this for you and installs Porter's skills.
* [Install the Porter GitHub App](/applications/deploy/connect-github) on the repository you want to deploy. The MCP server cannot install the GitHub App for you.
```text theme={null}
Deploy this GitHub repository to Porter. Detect the build method and application settings from the codebase.
```
The agent resolves your Porter project and cluster, then calls `create_app` with the repository source and build configuration. Porter creates the application with a placeholder image and opens a pull request containing a GitHub Actions workflow.
Review and merge the pull request that the agent returns. Merging it triggers the workflow that builds your code and runs the first real deployment.
In the Porter dashboard, click **Create Application**, then choose your source.
Porter builds your application from source code and sets up automated deployments on every push.
If this is your first deployment, [install the Porter GitHub App](/applications/deploy/connect-github):
 1. Click **Connect repositories**
2. Authorize the Porter GitHub App
3. Choose which repositories Porter can access (all repositories or select specific ones)
Porter needs read access to detect your code structure and write access to create the deployment workflow.
1. Choose the repository containing your application
2. Select the branch to deploy (defaults to `main` or `master`)
1. Click **Connect repositories**
2. Authorize the Porter GitHub App
3. Choose which repositories Porter can access (all repositories or select specific ones)
Porter needs read access to detect your code structure and write access to create the deployment workflow.
1. Choose the repository containing your application
2. Select the branch to deploy (defaults to `main` or `master`)
 Porter scans your repository and automatically detects:
* Frameworks and languages (Node.js, Python, Go, etc.)
* Dockerfiles
* Service types (web servers, workers, etc.)
Porter scans your repository and automatically detects:
* Frameworks and languages (Node.js, Python, Go, etc.)
* Dockerfiles
* Service types (web servers, workers, etc.)
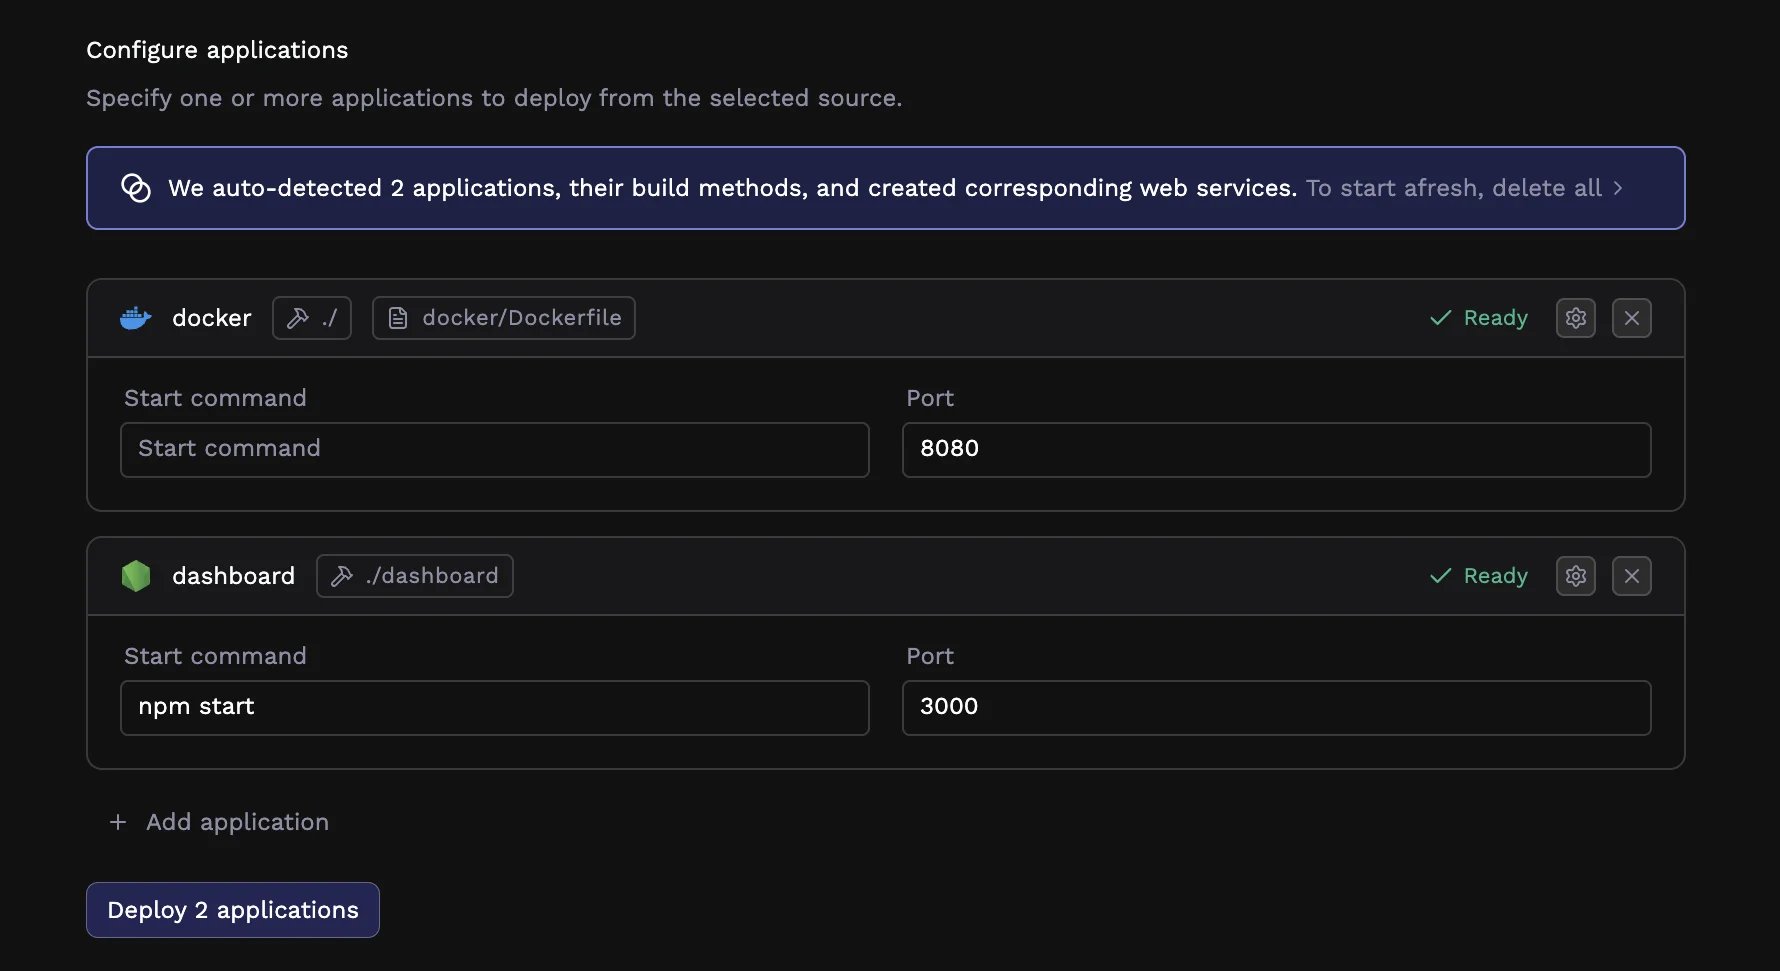 You'll see a card for each detected application showing the app name, detected framework, and repository path.
For monorepos with multiple services, Porter detects each application separately. A Node.js API in `/api` and a React frontend in `/web` appear as distinct applications. If some services are already deployed on your cluster, Porter hides them by default so you can focus on new applications. Expand the **previously deployed** section to view or re-add them.
Click the **gear icon** on any application card to customize:
You'll see a card for each detected application showing the app name, detected framework, and repository path.
For monorepos with multiple services, Porter detects each application separately. A Node.js API in `/api` and a React frontend in `/web` appear as distinct applications. If some services are already deployed on your cluster, Porter hides them by default so you can focus on new applications. Expand the **previously deployed** section to view or re-add them.
Click the **gear icon** on any application card to customize:
 * **Build method**: Docker (using your Dockerfile) or Buildpacks (automatic)
* **Start command**: The command to run your application
* **Port**: The port your application listens on
For most applications, Porter's detected defaults work without changes.
Click **Deploy** to start your deployment.
This step is critical. Your application won't be available until you merge the PR.
Porter creates a pull request in your repository containing a GitHub Actions workflow file at `.github/workflows/porter.yml`. This workflow handles building and deploying your application on every push.
After clicking Deploy, you'll see:
* A **toast notification** with a "View PR" button that links directly to the pull request
* A **warning banner** on your app's page with a "Merge PR" link
* **Build method**: Docker (using your Dockerfile) or Buildpacks (automatic)
* **Start command**: The command to run your application
* **Port**: The port your application listens on
For most applications, Porter's detected defaults work without changes.
Click **Deploy** to start your deployment.
This step is critical. Your application won't be available until you merge the PR.
Porter creates a pull request in your repository containing a GitHub Actions workflow file at `.github/workflows/porter.yml`. This workflow handles building and deploying your application on every push.
After clicking Deploy, you'll see:
* A **toast notification** with a "View PR" button that links directly to the pull request
* A **warning banner** on your app's page with a "Merge PR" link
 Click either link to open the pull request on GitHub, then merge it. After merging, click **Refresh** on the banner to update the status. GitHub Actions triggers automatically and your first deployment begins.
The workflow Porter creates looks like this:
```yaml theme={null}
on:
push:
branches:
- main
name: Deploy to Porter
jobs:
porter-deploy:
runs-on: ubuntu-latest
steps:
- uses: actions/checkout@v4
- uses: porter-dev/setup-porter@v0.2.0
- run: porter apply
env:
PORTER_TOKEN: ${{ secrets.PORTER_APP_... }}
```
This approach works well when you have an existing CI/CD pipeline or are deploying third-party images.
From the Create Application screen, click **Or, deploy from a container registry** in the top right.
Click either link to open the pull request on GitHub, then merge it. After merging, click **Refresh** on the banner to update the status. GitHub Actions triggers automatically and your first deployment begins.
The workflow Porter creates looks like this:
```yaml theme={null}
on:
push:
branches:
- main
name: Deploy to Porter
jobs:
porter-deploy:
runs-on: ubuntu-latest
steps:
- uses: actions/checkout@v4
- uses: porter-dev/setup-porter@v0.2.0
- run: porter apply
env:
PORTER_TOKEN: ${{ secrets.PORTER_APP_... }}
```
This approach works well when you have an existing CI/CD pipeline or are deploying third-party images.
From the Create Application screen, click **Or, deploy from a container registry** in the top right.
 Enter your image details:
* **Image repository**: The full path to your image
* Docker Hub: `docker.io/username/image` or `username/image`
* Amazon ECR: `123456789.dkr.ecr.us-east-1.amazonaws.com/my-app`
* Google Artifact Registry: `us-docker.pkg.dev/project-id/repo/image`
* Azure Container Registry: `myregistry.azurecr.io/my-app`
* **Tag**: The version to deploy (e.g., `latest`, `v1.2.3`, or a commit SHA)
Enter your image details:
* **Image repository**: The full path to your image
* Docker Hub: `docker.io/username/image` or `username/image`
* Amazon ECR: `123456789.dkr.ecr.us-east-1.amazonaws.com/my-app`
* Google Artifact Registry: `us-docker.pkg.dev/project-id/repo/image`
* Azure Container Registry: `myregistry.azurecr.io/my-app`
* **Tag**: The version to deploy (e.g., `latest`, `v1.2.3`, or a commit SHA)
 Porter creates an application configuration with sensible defaults. Since Porter can't inspect your pre-built image, you'll need to specify:
* **Port**: The port your container listens on (for web services)
* **Start command**: Override the image's default CMD if needed
Click the **gear icon** to adjust resources (CPU, RAM, instances) if the defaults don't fit your needs.
Click **Deploy** to pull your image and start running it.
To update your application later, push a new image tag and use the Porter CLI:
```bash theme={null}
porter app update-tag APP_NAME --tag NEW_TAG
```
Deploy the application from a `porter.yaml` file:
```bash theme={null}
porter apply -f porter.yaml
```
Learn how to define and deploy an application in the [configuration-as-code guide](/applications/configuration-as-code/overview).
***
## Step 5: View your running application
Return to the Porter dashboard to monitor your deployment:
1. Click on your application to view deployment progress
2. Watch the build logs as Porter builds your container image
3. Monitor the deployment as Porter starts your application
Once the deployment completes, your application status changes to **Running**.
### Access your application
Porter automatically provisions a public URL for your application at `*.onporter.run`. Click the URL in your dashboard to visit your deployed application.
Porter creates an application configuration with sensible defaults. Since Porter can't inspect your pre-built image, you'll need to specify:
* **Port**: The port your container listens on (for web services)
* **Start command**: Override the image's default CMD if needed
Click the **gear icon** to adjust resources (CPU, RAM, instances) if the defaults don't fit your needs.
Click **Deploy** to pull your image and start running it.
To update your application later, push a new image tag and use the Porter CLI:
```bash theme={null}
porter app update-tag APP_NAME --tag NEW_TAG
```
Deploy the application from a `porter.yaml` file:
```bash theme={null}
porter apply -f porter.yaml
```
Learn how to define and deploy an application in the [configuration-as-code guide](/applications/configuration-as-code/overview).
***
## Step 5: View your running application
Return to the Porter dashboard to monitor your deployment:
1. Click on your application to view deployment progress
2. Watch the build logs as Porter builds your container image
3. Monitor the deployment as Porter starts your application
Once the deployment completes, your application status changes to **Running**.
### Access your application
Porter automatically provisions a public URL for your application at `*.onporter.run`. Click the URL in your dashboard to visit your deployed application.
 Congratulations! Your application is now live and will automatically redeploy whenever you push to your selected branch.
***
## Next steps
Now that your application is running, explore these guides to customize your deployment:
Connect your own domain name to your application.
Configure secrets and environment variables for your app.
Scale your application automatically based on traffic.
Add workers, jobs, and configure service settings.
Congratulations! Your application is now live and will automatically redeploy whenever you push to your selected branch.
***
## Next steps
Now that your application is running, explore these guides to customize your deployment:
Connect your own domain name to your application.
Configure secrets and environment variables for your app.
Scale your application automatically based on traffic.
Add workers, jobs, and configure service settings.